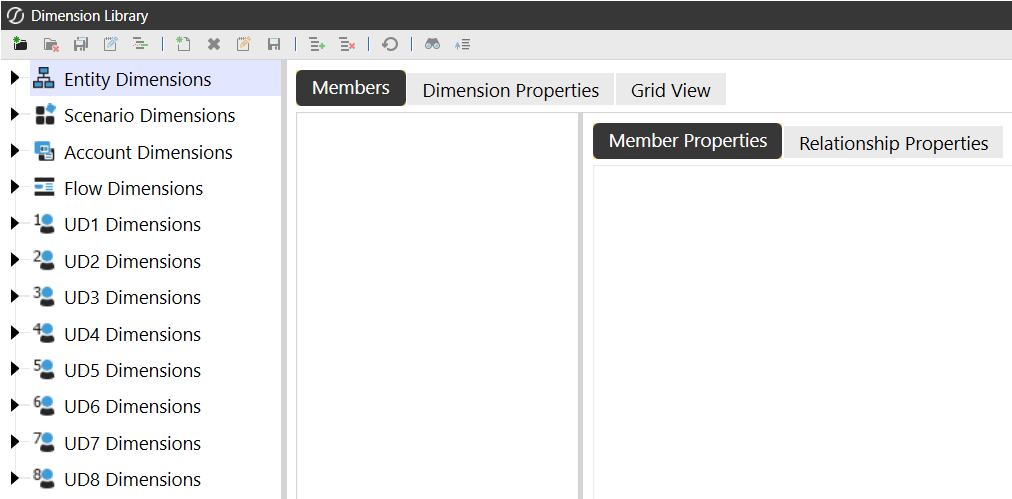
Configurable dimension types include entity, scenario, account, flow, user defined, parent, intercompany, time, and consolidation.
Entity, scenario, account, flow, and user defined dimensions are created, maintained, and edited in the Dimension Library.
Parent and intercompany dimensions are derived based on the entity dimension and its properties.
Before an application is created, the time dimension can be customized in System > Time Dimensions and Application > Time Profiles. After an application is created, the time dimension cannot be edited, but it can be viewed using the point of view (POV) pane.
The consolidation dimension has currencies that are added to Application Properties. The consolidation dimension is not editable in the Dimension Library, but it can be viewed using the POV pane.
The Dimension Library enables all the customizable dimensions to be defined for your business needs. Dimensions can be shared across multiple cubes. Defining dimensions is important for sharing between cubes.
The entity, scenario, account, flow, and user defined dimensions are created and maintained in the Dimension Library in Application > Cube > Dimensions.

The following icons are in the Dimension Library toolbar.
![]() Create Dimension: Creates a new dimension.
Create Dimension: Creates a new dimension.
![]() Delete Selected Dimension: Deletes a dimension after its members are deleted.
Delete Selected Dimension: Deletes a dimension after its members are deleted.
 Save Dimension: Saves changes to the dimension properties.
 Rename Dimension: Renames a dimension.
If you rename a dimension, you need to update objects that reference that dimension. For example, cube, data sources, transformation rules.
 Move Dimension: Moves a dimension. You can move a dimension one level above a parent or below a sibling.
This action is not supported for entity dimensions, but can be used for account, scenario, flow, and user defined dimensions.
 Create Member: Creates a new member for the selected dimension.
The maximum member name length is 500 characters.
![]() Delete Selected Member: Deletes a selected member that has no data stored.
Delete Selected Member: Deletes a selected member that has no data stored.
![]() Rename Selected Member: Renames a selected member in the Dimension Library only.
Rename Selected Member: Renames a selected member in the Dimension Library only.
It does not rename the member in other areas.
![]() Save Member: Saves changes to the member properties.
Save Member: Saves changes to the member properties.
![]() Add Relationship for Selected Member: Moves a member to another hierarchy or places it in more than one hierarchy.
Add Relationship for Selected Member: Moves a member to another hierarchy or places it in more than one hierarchy.
 Remove Selected Relationship Without Deleting Member: Removes a member from a hierarchy without deleting the selected member. This can also be done by right-clicking on a dimension member.
![]() Cancel All Changes Since Last Save: Cancels changes made to the member and dimension properties since the last save.
Cancel All Changes Since Last Save: Cancels changes made to the member and dimension properties since the last save.
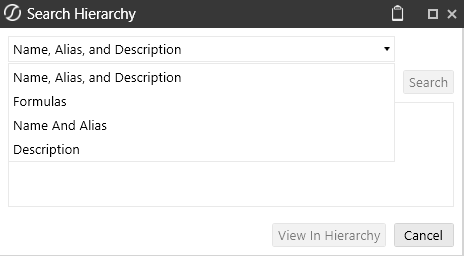
![]() Search Hierarchy: Searches for a member within a dimension member hierarchy. This search will produce every hierarchy in which a member appears. Search using Name, Alias, and Description, Formulas, Name And Alias, or Description.
Search Hierarchy: Searches for a member within a dimension member hierarchy. This search will produce every hierarchy in which a member appears. Search using Name, Alias, and Description, Formulas, Name And Alias, or Description.
![]() Collapse Hierarchy: Collapses a member hierarchy within a dimension.
Collapse Hierarchy: Collapses a member hierarchy within a dimension.
The following icon displays in all dimension security properties.
![]() Navigate to Security: Navigates to the Security page. Use this icon to make changes to security users or groups before assigning them to specific dimensions.
Navigate to Security: Navigates to the Security page. Use this icon to make changes to security users or groups before assigning them to specific dimensions.
To view the Members tab, go to Application > Cube > Dimensions and select a dimension member. Then, click the Members tab.
In the Members tab, dimensions can be viewed by members, orphans, or in a hierarchy.
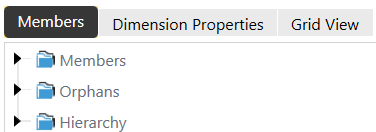
Members: All members within the selected dimension, including orphans.
Orphans: Members not assigned to a dimension hierarchy.
Hierarchy: Members in the chosen dimension in their hierarchy.
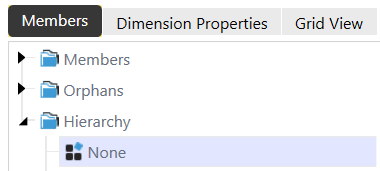
Every dimension hierarchy has a None member. The None member is used when no selection for the dimension is needed or applicable.
The None member is referenced in the POV pane if the dimension is not needed in the analysis or data load.
Dimensions contain members that can be inherited and extended through Extensible Dimensionality. Use the Add Relationship for Selected Member icon to move a member to another hierarchy or place it in more than one hierarchy.
Dimension members have Member Properties and Relationship Properties tabs. The properties on these tabs vary by dimension type. Depending on the field, you can edit the properties using the following methods:
Typing directly in the field
Clicking the ellipsis to open a dialog box
Clicking the Navigate to Security icon in the Security section
Double-clicking in a field to generate a drop-down menu
Member Properties are settings specific to the individual member. These properties apply to the member regardless of its relationship to a particular parent member in the hierarchy. If a member is part of multiple hierarchies, updates to the Member Properties apply to the member as it displays in all hierarchies regardless of which relationship is selected when the Member Properties are updated.
Member Properties are grouped into categories (for example, General, Descriptions, and Security). Various property fields are included in each category. Both the categories and their property fields vary across the dimension types. The plus and minus icons next to each category can be used to expand or collapse it.
To view the Member Properties tab, go to Application > Cube > Dimensions and select a dimension member. Click the Members tab and then the Member Properties tab. For example, this image shows the entity dimension.
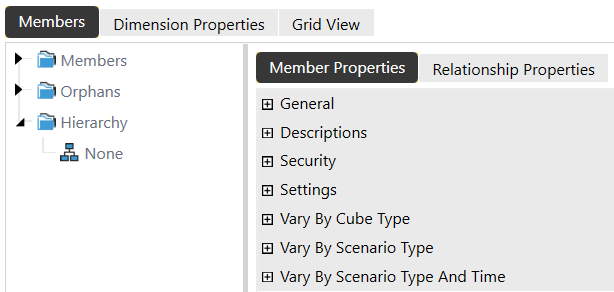
These properties are standard across the entity, scenario, account, flow, and user defined dimensions:
Dimension Type: Indicates which dimension is being used.
Dimension: Indicates the dimension name.
Member Dimension: The dimension to which it is a member.
Id: A numerical identity that is automatically assigned by the application when the member is created. This number cannot be changed, even if the member name is changed.
Name: The name of the member in the dimension.
Alias: Use this property to add aliases to dimension members. Aliases are optional names that you can use as alternative ways to reference members from areas such as Member Filters, Cube Views, or Business Rules. This enables you to use additional, readable names for dimension members in new or existing solutions, without disrupting existing solutions that reference the main dimension member names. For example, you can add the original dimension member name as an alias before renaming the dimension member name to ensure existing solutions referencing the dimension member do not break after the name change. Multiple aliases can also be added to the same dimension member through a comma-delimited list.
You cannot have duplicate alias names in the same dimension type. You cannot create an alias with the same name as a different dimension member within the same dimension type, and you cannot create a new member with the same name as an existing alias within the same dimension type.
The following properties only display for a Dynamic
External Member Id: A numerical identity for the external member.
External Member Name: The name of the external member in the dynamic dimension.
Default Description: A description of the member in the dimension. See Report Alias.
If the Application Server Configuration File has been updated to include additional cultures, other language description fields may display under the Default Description field.
Relationship Properties are settings associated with the relationship between members in the hierarchy. Relationship Properties can vary by each parent-child relationship, so different behaviors can occur based on the selected relationship.
To view the Relationship Properties tab, go to Application > Cube > Dimensions and select a dimension member. Click the Members tab and then the Relationship Properties tab. For example, this image shows the entity dimension.

These properties are standard across the entity, scenario, account, flow, and user defined dimensions:
Dimension Type: Indicates which dimension is being used.
Dimension: Indicates the dimension name.
Parent Member Dimension: Displays the name of the parent member. This may be blank if it is at the root level.
Member Dimension: Displays the name of the member.
Parent Member Name: Displays the direct parent to the member. This may display Root if it is the first branch.
Member Name: Displays the name of the member as it was defined.
When a new member is created, it is added to the bottom of the list of its siblings.
Position: Use this field to change the current level of the member in the hierarchy in relation to its siblings. This setting cannot move a member out of the current hierarchy.
Sibling Member: Displays a list of all the siblings in the current hierarchy available to move based on the setting in the Position field.
To view the Dimension Properties tab, go to Application > Cube > Dimensions and select a dimension member. Then click the Dimension Properties tab.
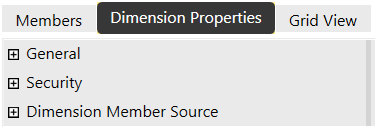
These properties are standard across the entity, scenario, account, flow, and user defined dimensions:
Dimension Type: Indicates the current dimension type.
Id: A numerical identity that is automatically assigned by the application when the dimension is created. This number cannot be changed, even if the dimension name is changed.
Name: Indicates the current name of the dimension.
Description: Indicates the current description of the dimension.
Access Group: Displays the security group that has access to the dimension.
Maintenance Group: Displays the security group that has access and can make changes to the dimension.
Source Type: The approach used to specify members for this dimension. For example, members and relationships for a Standard dimension are created manually using the Dimension Library Editor or by using XML load. Members and relationships for a Dynamic dimension can be sourced from external data using a custom implementation in a Workspace Assembly
Standard: Normal metadata member must match a cube.
Business Rule: Connects to a business rule so that a set of members does not have to match a cube.
Dynamic Dimensions: Sources members and relationships for a Dynamic Dimensions to cache metadata from an external source into
XBRL: Connects to an XBRL (extensible business reporting language) taxonomy. XBRL is a language for the electronic communication of business and financial data worldwide.
Source Path: If the Source Type is Business Rule or XBRL, enter the business rule name or the full file system path for the XBRL taxonomy link definition file. For example, Internal/XBRL/Taxonomies/EntryPoints/. You can also enter a Workspace Assembly Service to run for a Dynamic Dimension. For example, Workspace.DynamicDimensionsWS.WS.
Name Value Pairs: If the Source Type is Business Rule or XBRL, enter a comma-separated list of name-value pairs.
Select the Grid View tab to view a complete list of members from a selected dimension. You can view and edit properties of multiple members in the same screen without navigating to one member at a time. The following icons are in the Grid View toolbar:
 Member Filter: Narrows the list to view specific members. See Member Filter Builder.
 Grid Settings: Changes the data displayed.
![]() Save: Saves changes.
Save: Saves changes.
![]() Refresh: Updates the data.
Refresh: Updates the data.
To change the metadata settings of multiple members in this view, double-click a data cell.
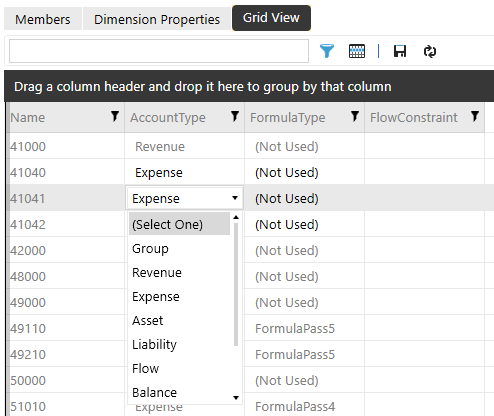
Members displayed can change based on cube type, scenario type, and the time member chosen. Grid Columns to Display lists all the member properties available. Select the ones to display and edit in the grid.
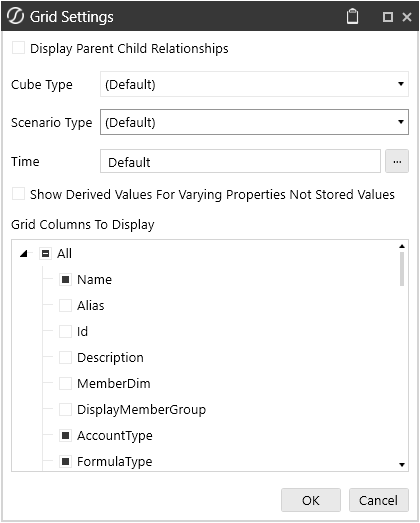
Click Grid Settings to change the data displayed.
In Grid Settings:
In Grid Columns to Display, select the member properties to view and edit in the grid.
To create a new dimension:
In the Dimension Library, select a dimension type.
Click the Create Dimension icon.
Enter a name.
Click the OK button.
To create a new member in the dimension:
Select the dimension.
Click the Create Member icon.
In the Member Properties tab, enter a name and default description. Add and update any additional properties as needed.
In the Relationship Properties tab, add and update as needed.
Click the Save Member icon.
To create a new member using the same settings as the selected member.
In the Members tab, select a member and then right-click.
Hover over Clone Member to display the menu of options.
Select the option to clone the new member as: As First Child, As Last Child, As Previous Sibling, or As Next Sibling.
Formula types and formulas do not copy to the new member.
In the Member Properties tab, enter a name and default description. Add and update any additional properties as needed.
In the Relationship Properties tab, add and update as needed.
Click the Save Member icon.
This option alters the position of a member in the hierarchy in relation to a sibling.
In the Members tab, select a member.
Click the Relationships Properties tab.
Click the Position drop-down menu.
Select the new position for the member: Retain Current Position, Before Sibling Member, After Sibling Member, First Sibling, or Last Sibling.
Click the Sibling Member drop-down menu.
Select the sibling member.
Click the Save Member icon.
This option expands all the descendants for the selected member.
In the Members tab, select a member that has children and then right-click.
Click Expand All Descendants.
This option adds or moves copied members to a new hierarchy.
In the Members tab, select a member and then right-click.
Press Ctrl + click to select multiple items.
Click Copy Selected Members.
Right-click the name of another member.
Select the paste option:
Click Paste Relationships (Add) to create a new relationship for the copied members.
Click Paste Relationships (Move) to remove members from their current relationship and move them to a new one.
Select the location to paste the copied member: As First Child, As Last Child, As Previous Sibling, or As Next Sibling.
This creates a relationship between two members.
In the Members tab, select a member.
Click the Add Relationship For Selected Member icon.
Click the ellipsis next to Child Member to select the child member.
Click the OK button.
This option removes members from their current relationship without moving them to a new one. If the member is no longer part of the dimension structure, it will be placed under Orphans. This option will not delete the member.
In the Members tab, select a member.
Click the Remove Relationships icon.
You can also select a member and then right-click to see an option for Remove Relationships.
This option deletes the selected member from the Dimension Library. A member can only be deleted if it does not have data stored.
In the Members tab, select a member.
Click the Delete Selected Member icon.
You can also select a member and then right-click to see an option for Delete Member.
Use the following guidelines when creating dimension member names:
Names must be unique within a dimension type.
There can be only one account named GrossIncome across all account dimensions.
Names have a 500 character limit.
Use underscores in place of spaces and periods. Square brackets do not need to be used if a member name has an underscore.
Spaces are allowed but not recommended.
If a member name includes a space or a period, square brackets must be used if the member is queried.
E#[Quebec.City]
Restricted characters should not be used in dimension member names:
|
Character |
Name and Description |
|---|---|
|
& |
Ampersand The ampersand character can be used in member names, but it may affect platform functionality. So, it is recommended to not use it. |
|
* |
Asterisk |
|
@ |
At sign |
|
\ |
Back slash |
|
{ } |
Brace (left and right) |
|
[ ] |
Bracket (left and right) |
|
^ |
Caret |
|
, |
Comma |
|
= |
Equal sign |
|
! |
Exclamation point |
|
> |
Greater than sign |
|
< |
Less than sign |
|
- |
Minus sign |
|
# |
Number sign |
|
% |
Percent The percent character can be used in member names, but it may affect platform functionality. So, it is recommended to not use it. The percent character cannot be used in an alias name. |
|
| |
Pipe or vertical bar |
|
+ |
Plus sign |
|
? |
Question mark |
|
" |
Quotation marks |
|
; |
Semicolon |
|
/ |
Slash |
Reserved words cannot be used in dimensions or other structural application components, such as cubes.
Account
All
Cons
Consolidation
Default
DimType
Entity
EntityDefault
Flow Origin
IC
None
Parent
POV
Root
RootAccountDim
RootEntityDim
RootFlowDim
RootScenarioDim
RootUD1Dim
RootUD2Dim
RootUD3Dim
RootUD4Dim
RootUD5Dim
RootUD6Dim
RootUD7Dim
RootUD8Dim
Scenario
Time
UD1 – UD8
UD1Default
Unknown
View
WF
Workflow
XFCommon